dendrocat
Introduction
This is the documentation for dendrocat, a package for detecting and processing sources in radio images. dendrocat provides classes and methods to do the following core functions:
- Pipeline radio images to source catalogs
- Match sources between multiple catalogs
- Aperture photometry on source catalogs
Note that this package relies on other astronomy-related Python packages to function, which themselves may be in development.
- Code: Github repository
- Docs: dendrocat
- Contributors: https://github.com/cmcclellan1010/dendrocat/graphs/contributors
Getting Started
The procedure for creating radio source objects, generating dendrograms, and creating source catalogs is demonstrated below. This example uses default settings. In-depth documentation is located in the Using dendrocat section.
RadioSource is the starting place for any analysis to be done using dendrocat. It takes a radio image, extracts information from the FITS header, and sets attributes that are necessary for further processing.
>>> from dendrocat import RadioSource
>>> from astropy.io import fits
>>> source_object = RadioSource(fits.open('/path/to/file.fits'))
>>> source_object
<dendrocat.radiosource.RadioSource at 0x7fda2f851080>
Note
FITS header extraction is undergoing development. Currently, only specific headers from EVLA and ALMA are supported, but this will change soon. See The RadioSource Class for details.
RadioSource objects should be named to distinguish them from others that may be combined later. This can be done using the keyword argument name when initializing the RadioSource, or afterwards by setting the instance attribute manually.
A catalog of sources can then be created using dendrograms.
>>> source_object.to_catalog()
Generating dendrogram using 738,094 of 49,787,136 pixels (1.4824994151099593% of data)
[========================================>] 100%
Computing catalog for 113 structures
[========================================>] 100%
<Table masked=True length=113>
_idx _index _name  ... rejected 226.1GHz_detected
 ...    ...   ...  ...      ...              ...
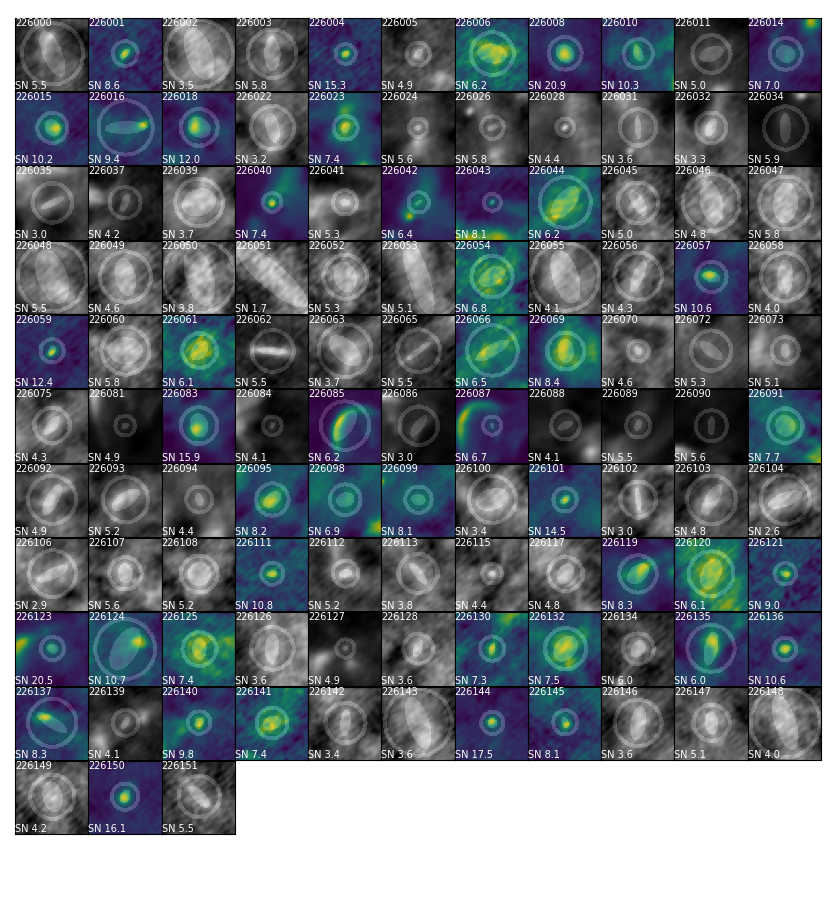
Most false detections (i.e., noise) can be filtered out using the autoreject method, with the signal-to-noise requirement specified as a keyword argument threshold. To view all the image cutouts around each source in a grid, call the plot_grid method. Rejected sources are greyed out, and the source apertures used to calculate the signal to noise are overplotted on top of the image.
>>> source_object.autoreject(threshold=6.)
>>> source_object.plot_grid(skip_rejects=False)
Sources can then be manually accepted or rejected using accept or reject (and reset entirely using reset).
>>> source_object.reject([226000, 226008, 226016, 226023, 226028, 226085, 226124, 226135, 226137])
>>> source_object.accept([226024, 226043, 226123])
>>> source_object.plot_grid(skip_rejects=False)

The identifiers used to accept and reject sources are those stored under the _name column in the RadioSource object’s catalog. More information about accessing Astropy tables can be found in the Accessing a table section of the Astropy documentation.
dendrocat.utils.saveregions can be used to save a DS9 region file of all the apertures in a catalog. With an image open in DS9, overlay the region file to check each aperture and find the label (saved as _name in the source catalog) to use for manual acceptance or rejection.
>>> dendrocat.utils.saveregions(source_object.catalog, '/path/to/outputfile.reg')
The RadioSource object is (more or less) complete after source rejection is finished. It can be combined with other RadioSource objects to form a MasterCatalog. The catalogs of all the RadioSource objects are combined using dendrocat.utils.match.
from astropy.io import fits
from dendrocat import RadioSource, MasterCatalog
from dendrocat.utils import match

source_object1 = RadioSource(fits.open('/path/to/file1.fits'), name='so1')
source_object2 = RadioSource(fits.open('/path/to/file2.fits'), name='so2')

source_object1.autoreject()
source_object2.autoreject()

combined_catalog = match(source_object1.catalog, source_object2.catalog)

mastercatalog = MasterCatalog(source_object1, source_object2, catalog=combined_catalog)
Note
match operates on RadioSource and MasterCatalog objects only, and will not take plain catalogs as arguments. To match catalogs that have been manually edited, filtered, etc., make customizations to the RadioSource and MasterCatalog catalogs before matching.
The MasterCatalog stores each of the RadioSource objects as instance attributes. These can be accessed using the __name__ of each RadioSource. It also has its own catalog, which is usually the matched catalog of its constituent RadioSource objects.
>>> mastercatalog.__dict__.keys()
dict_keys(['catalog', 'accepted', 'so1', 'so2'])

>>> mastercatalog.so1
<dendrocat.radiosource.RadioSource at 0x7f0c25f29fd0>
The main purpose of the MasterCatalog is as a framework for photometry. Photometry is done using Aperture objects, which define the shape and behavior of the apertures used to photometer the sources in a catalog.
The MasterCatalog class performs photometry by taking an aperture and placing it over the locations of all the sources in its catalog. The apertures may also be scaled according to the FWHM of the source.
An Aperture should be made into an instance if you want to use fixed-dimension apertures—for example, a circular aperture with a constant radius of 15 pixels.
import astropy.units as u
from dendrocat.aperture import Circle, Annulus

# Define a fixed-radius circular aperture in pixels
fixed_circle = Circle([0, 0], 15*u.pix, name='fixedcirc')

# Define a fixed-dimension annular aperture in pixels
fixed_annulus = Annulus([0, 0], 30, 40, unit=u.pix, name='fixedannulus')
Now, photometry can be done on the MasterCatalog object.
mastercatalog.photometer(fixed_circle, fixed_annulus)
For apertures that change shape according to the major and minor FWHM of each source, simply use the class itself instead of creating an instance.
mastercatalog.photometer(Circle, Annulus)
The source catalog is updated to include photometry data for all available frequencies, in each of the specified apertures.
>>> mastercatalog.catalog.colnames
 [...
 '226.1GHz_fixedcirc_peak',
 '226.1GHz_fixedcirc_sum',
 '226.1GHz_fixedcirc_rms',
 '226.1GHz_fixedcirc_median',
 '226.1GHz_fixedcirc_npix',
 '93.0GHz_fixedcirc_peak',
 '93.0GHz_fixedcirc_sum',
 '93.0GHz_fixedcirc_rms',
 '93.0GHz_fixedcirc_median',
 '93.0GHz_fixedcirc_npix',
 '226.1GHz_fixedannulus_peak',
 '226.1GHz_fixedannulus_sum',
 '226.1GHz_fixedannulus_rms',
 '226.1GHz_fixedannulus_median',
 '226.1GHz_fixedannulus_npix',
 '93.0GHz_fixedannulus_peak',
 '93.0GHz_fixedannulus_sum',
 '93.0GHz_fixedannulus_rms',
 '93.0GHz_fixedannulus_median',
 '93.0GHz_fixedannulus_npix',
 '226.1GHz_Circle_peak',
 '226.1GHz_Circle_sum',
 '226.1GHz_Circle_rms',
 '226.1GHz_Circle_median',
 '226.1GHz_Circle_npix',
 '93.0GHz_Circle_peak',
 '93.0GHz_Circle_sum',
 '93.0GHz_Circle_rms',
 '93.0GHz_Circle_median',
 '93.0GHz_Circle_npix',
 '226.1GHz_Annulus_peak',
 '226.1GHz_Annulus_sum',
 '226.1GHz_Annulus_rms',
 '226.1GHz_Annulus_median',
 '226.1GHz_Annulus_npix',
 '93.0GHz_Annulus_peak',
 '93.0GHz_Annulus_sum',
 '93.0GHz_Annulus_rms',
 '93.0GHz_Annulus_median',
 '93.0GHz_Annulus_npix']
Photometry data for each of the sources can then be accessed using each of these column names.
To save any catalog for later use, use write.
>>> mastercatalog.catalog.write('/path/to/outfile.dat', format='ascii', overwrite=True)