The RadioSource Class
Initializing a RadioSource object will attempt to extract data from the FITS file header of the image. Since FITS headers vary between telescopes and observations, support for new header formats is added as needed.
Currently, dendrocat supports FITS header information extraction from the following telescopes:
- EVLA
- ALMA
Note
In a future update, this functionality will be replaced by a fitsconfig file that will tell the program where to find the information it needs. Users can add to their fitsconfig to handle unsupported formats.
Manually Setting FITS Header Information
If the FITS header is not recognized, the missing attributes will be printed to the console so they can be set manually. Typically, this will include
nu: The central frequency of the observation. Specified as aastropy.units.quantity.Quantity.freq_id: A string used to identify different images at a glance. For a 226 GHz observation, for example, thefreq_idcould be'226.1GHz'.metadata: Image metadata required for generating a dendrogram.
import dendrocat
from astropy.io import fits
import astropy.units as u

source_object = dendrocat.RadioSource(fits.open('/path/to/file.fits'))

# Manually set RadioSource attributes
source_object.nu = 226.1*u.GHz
source_object.freq_id = '226.1GHz'
source_object.set_metadata()
If the wcs, beam, and pixel scale are successfully extracted from the FITS header, after manually setting nu the method set_metadata can be called to fill in the rest of the metadata.
Warning
FITS header formats from telescopes other than EVLA and ALMA are likely not supported at this time. The ability to load data with custom headers is in development.
Custom Dendrograms
The method to_dendrogram returns a astrodendro.dendrogram.Dendrogram object and adds it as an instance attribute of the RadioSource object.
>>> source_object.to_dendrogram()
Generating dendrogram using 738,094 of 49,787,136 pixels (1.4824994151099593% of data)
[========================================>] 100%
<astrodendro.dendrogram.Dendrogram at 0x7f00edfe7ac8>

>>> source_object.dendrogram
<astrodendro.dendrogram.Dendrogram at 0x7f00edfe7ac8>
Default dendrogram parameters are produced when the RadioSource object is first initiated. They are based on the standard deviation of pixel values across the whole image, and may need to be adjusted depending on how noisy the image is.
# Option 1 - Set dendrogram parameters as instance attributes
import numpy as np
source_object.min_value = 1.4*np.nanstd(source_object.data)
source_object.min_delta = 1.2*source_object.min_value
source_object.min_npix = 10
custom_dendro = source_object.to_dendrogram()

# Option 2 - Set dendrogram parameters as keyword arguments
custom_dendro = source_object.to_dendrogram(min_value=1e-4, min_delta=1.5e-4, min_npix=10)
Making A Source Catalog
to_catalog returns a source catalog as an astropy.table.Table object. It also saves the catalog as an instance attribute. If this method is called and the RadioSource object has no existing dendrogram, one will be generated using default parameters.
>>> source_object.to_catalog()
Computing catalog for 113 structures
[========================================>] 100%
<Table masked=True length=113>
_idx _index _name  ... rejected 226.1GHz_detected
 ...    ...   ...  ...      ...              ...

>>> source_object.catalog
<Table masked=True length=113>
_idx _index _name  ... rejected 226.1GHz_detected
 ...    ...   ...  ...      ...              ...
To generate a catalog from a specific astrodendro.dendrogram.Dendrogram object, use the dendrogram keyword argument.
>>> custom_dendro = source_object.to_dendrogram(min_value=1e-4, min_delta=1.5e-4, min_npix=10)
Generating dendrogram using 738,094 of 49,787,136 pixels (1.4824994151099593% of data)
[========================================>] 100%

>>> source_object.to_catalog(dendrogram=custom_dendro)
Computing catalog for 113 structures
[========================================>] 100%
 <Table masked=True length=113>
_idx _index _name  ... rejected 226.1GHz_detected
 ...    ...   ...  ...      ...              ...
Rejection and Plotting Grids
To flag false detections, the autoreject method can be used.
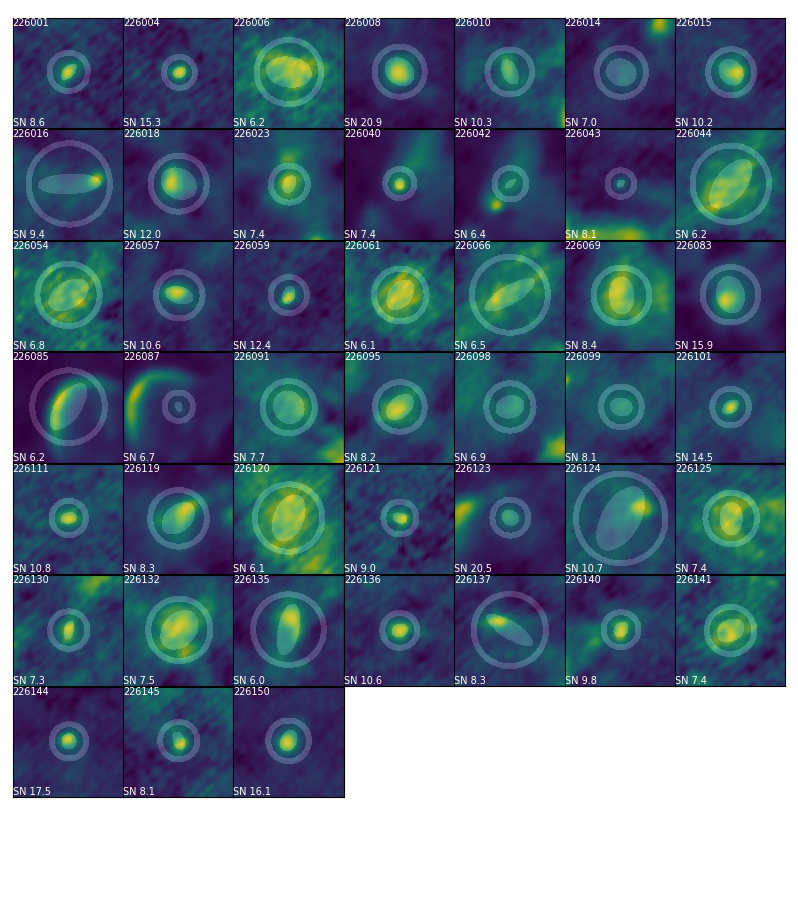
plot_grid displays cutout regions around each of the detected sources, as well as the apertures used to calculate signal-to-noise. Rejected sources show up in grey.
>>> source_object.autoreject(threshold=6.)
>>> source_object.plot_grid(skip_rejects=False)
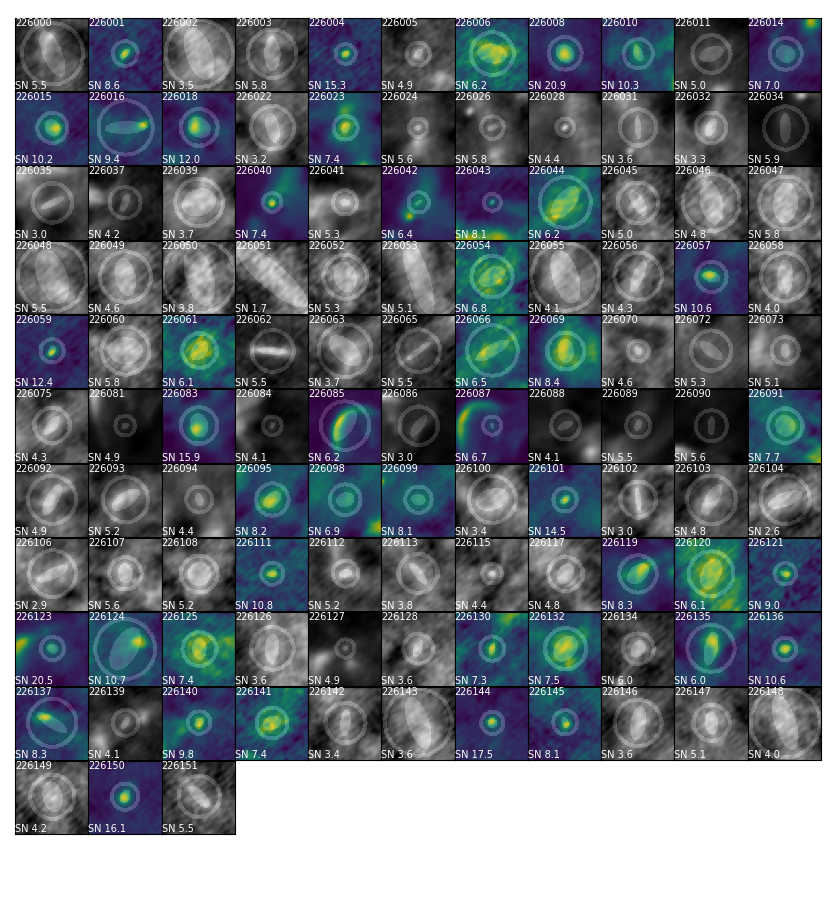
To display only accepted sources, use the skip_rejects keyword argument.
>>> source_object.plot_grid(skip_rejects=True)
In practice, it is often useful to examine the sources in the context of the original image. In this case, dendrocat.utils.saveregions can be used to save a DS9 region file of all the apertures in a catalog. With an image open in DS9, the region file can be loaded in to check each aperture and find the proper identifier (saved as _name in the source catalog) to use for manual acceptance or rejection.
>>> dendrocat.utils.saveregions(source_object.catalog, '/path/to/outputfile.reg')
Sources can be manually accepted and rejected using the accept and reject methods.
Accepted sources and rejected sources, including those set by accept and reject, are stored in their own catalogs and are accessible through the RadioSource object.
>>> source_object.accepted

<Table masked=True length=45>
 _idx _index _name  ... rejected 226.1GHz_detected
                    ...
int64 int64  str20  ...  int64         int64
----- ------ ------ ... -------- -----------------
    1      1 226001 ...        0                 1
    4      4 226004 ...        0                 1
    6      6 226006 ...        0                 1
    8      7 226008 ...        0                 1
  ...    ...    ... ...      ...               ...

>>> source_object.reject([226000, 226008])
>>> source_object.accepted

<Table masked=True length=43>
 _idx _index _name  ... rejected 226.1GHz_detected
                    ...
int64 int64  str20  ...  int64         int64
----- ------ ------ ... -------- -----------------
    1      1 226001 ...        0                 1
    4      4 226004 ...        0                 1
    6      6 226006 ...        0                 1
   10      8 226010 ...        0                 1
  ...    ...    ... ...      ...               ...
All rejections can be cleared using reset.
>>> source_object.reset()
>>> source_object.rejected

<Table masked=True length=0>
 _idx _index _name ...  y_cen  rejected 226.1GHz_detected
                   ...
int64 int64  str20 ... float64  int64         int64
----- ------ ----- ... ------- -------- -----------------
Adding Sources
If a single dendrogram can’t detect all the sources you’re interested in, you can create separate dendrograms with different parameters and add sources of interest from their catalogs to the catalog associated with the RadioSource object.
import dendrocat
from astropy.io import fits

source_object = dendrocat.RadioSource(fits.open('/path/to/file.fits'))

# Generate two separate dendrograms
default_dend = source_object.to_dendrogram()
custom_dend = source.object.to_dendrogram(min_delta=0.0002, save=False)

# Make catalogs
default_catalog = source_object.to_catalog()
custom_catalog = source_object.to_catalog(dendrogram=custom_dend)
Sources of interest not included in the default catalog are added using add_sources.
# Grab sources of interest, rename them to avoid name overlap with the other catalog
sources_of_interest = custom_catalog.grab([226000, 226001, 226002])
sources_of_interest['_name'] = ['custom1', 'custom2', 'custom3']

source_object.add_sources(sources_of_interest)